USM Haller anti-tip safety: anchoring your shelf to the wall
Whether USM Haller or built from compatible parts: made of steel, chrome and powder-coated panels, such a shelf looks rock solid. Still, any tall or narrow piece of furniture can tip over – especially when children climb it or several loaded drawers are open at the same time. The good news: a few simple measures keep your furniture standing safely. Here you will learn when wall anchoring is needed, how to fit it and what to watch out for in everyday use.
Why does furniture tip over?
A piece of furniture stays upright as long as its centre of gravity is above its footprint. With furniture on the 35 cm grid, that footprint is only about 35 cm deep – no matter how tall the unit is. The higher you build, the higher the centre of gravity and the less force it takes to pull the unit forward.
Two situations are typical:
- Load moving forward: When you pull out loaded drawers or put something heavy on an open flap door, the weight moves in front of the feet. If the weight at the front is equal to or greater than what remains in the unit (including the unit itself), it tips forward.
- External force: A child hanging from an upper compartment, a knock against the top edge, someone leaning on it to stand up – the higher the force acts, the greater the leverage.
When should I anchor my furniture to the wall?
As a rule of thumb for furniture on the 35 cm grid:
| Height (approx.) | Levels | Recommendation |
|---|---|---|
| up to 74 cm | 1–2 (lowboard, sideboard) | usually safe free-standing, heavy items at the bottom |
| from approx. 109 cm | 3 | wall anchoring recommended |
| from approx. 143 cm | 4 | wall anchoring strongly recommended |
| from approx. 178 cm | 5–6 | wall anchoring essential |
Regardless of height, you should secure the unit if there are children in the household, if it has several drawers or flap doors that carry heavy loads, if it has glass shelves or if you live in an earthquake zone. A narrow shelf that is only one compartment wide also tips more easily than a wide one.
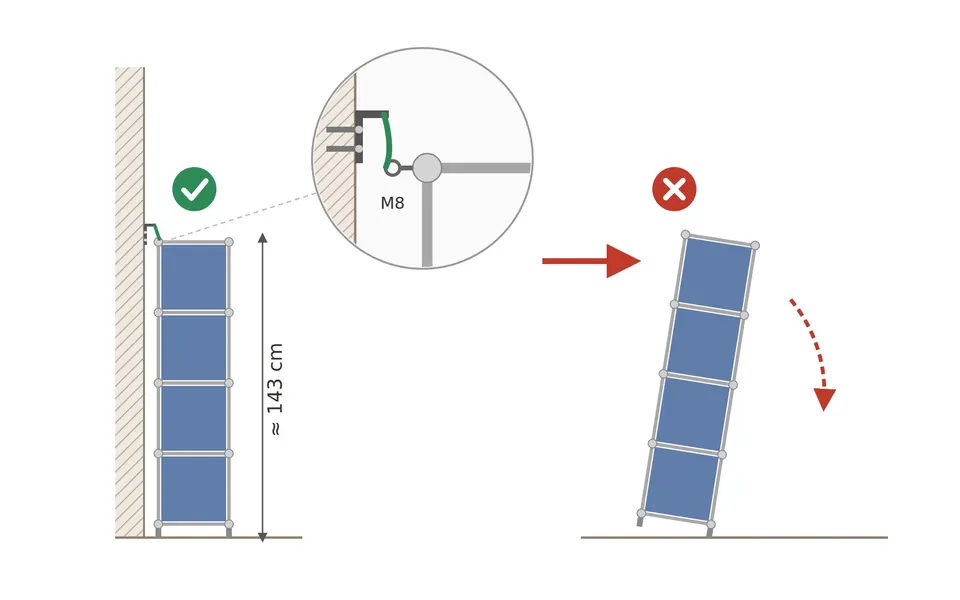
How to anchor furniture to the wall
We do not sell a dedicated wall anchoring kit. You don't need one, though: standard anti-tip devices from a DIY store (furniture brackets, safety straps, anti-tip kits) and the right wall plug will do the job.
1. Choose the fixing point on the furniture
Always secure the unit at the top and as far out as possible, i.e. at the rear top corners. That is where the leverage is greatest. On a wide unit, one point on each side is worthwhile.
Every ball has six threaded holes (M8 × 1.25). On a rear top ball, the hole facing the wall is often free. There you can, for example, screw in an M8 eye bolt and connect it to a wall bracket with a strap or wire. Check first that the hole really is free and the thread engages cleanly – never force it. If no hole is free, simply loop a safety strap around the upper rear tube.
2. Check the wall
- Concrete and solid brick: universal or expansion plugs of a suitable size.
- Perforated brick: plugs for hollow masonry or injection mortar.
- Plasterboard/drywall: cavity anchors or metal anchors; better still, a stud (wood or metal profile) behind the board.
- Wood: wood screws of sufficient length.
Before drilling, scan the spot with a cable detector. Walls often contain electrical, water or heating lines, especially running vertically above sockets and switches.
3. Fit and tension
Push the unit into place, level it with the levelling feet and allow a few centimetres of space to the wall – the balls protrude slightly. Mark the drill holes, fit the plugs and wall bracket and connect bracket and furniture. The strap should be taut without pulling the unit towards the wall. Finally, shake the top firmly: the unit must no longer tilt forward.
Not sure? Have a tradesperson do the fixing. It costs little and gives peace of mind – especially with plasterboard or old walls.
If wall anchoring is not possible
Rented flat, glass wall or the unit stands in the middle of the room? There are alternatives:
- Build lower and wider: instead of 1 × 5, choose 2 × 3 or 3 × 2 compartments – same storage, much more stable.
- Build around a corner: an L-shaped unit supports itself.
- Connect two units: two shelves firmly joined back to back or side by side have twice the footprint.
- Weight at the bottom: heavy files, books or devices go on the lowest level – this lowers the centre of gravity considerably.
- Fix to the floor: where possible, free-standing units can be screwed to the floor at diagonally opposite corners.
Drawers, flap doors and castors
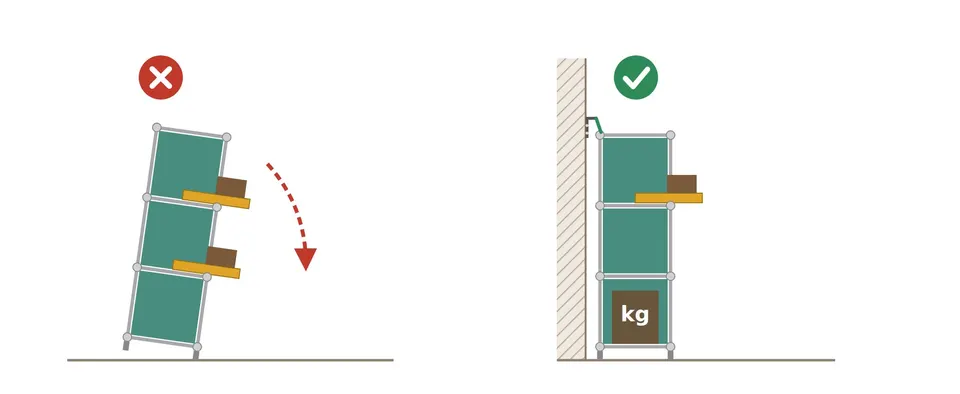
Pull-out shelves are handy, but they shift the weight forward. So only ever pull out one drawer and close it again right away. Heavy contents belong in the lower drawers. Flap doors should not be left open and should not be used as a shelf or step.
If your unit stands on castors, always lock them before opening drawers or folding doors down. When moving it: close everything first, then push slowly and watch out for thresholds and rug edges – a sudden stop can make a unit on castors tip forward. Furniture with glass shelves should not stand on castors.
Checklist: is my furniture tip-proof?
- Anchored to the wall from 3 levels (approx. 109 cm)
- Fixing at the top, at the outer rear corners
- Plugs suited to the wall, cables and pipes checked beforehand
- All feet touching the floor, unit levelled
- Heavy items at the bottom, light ones at the top
- Only one drawer open at a time
- Castors locked
- Children know: the shelf is not a climbing frame
- Check everything again after rebuilding or moving
Planning a new unit? In the 3D configurator you can see right away how tall and wide it will be – and choose a stable, wide shape before ordering the parts.
Frequently asked questions
Do I need to anchor a sideboard to the wall?
A lowboard or sideboard with 1–2 levels is usually stable because it is low and wide. If there are children in the house or it has several heavily loaded drawers, anchoring does no harm here either.
Can I use the threaded holes of the balls for fixing?
Yes, if a hole is free. Every ball has six M8 threads; on the rear top balls one often faces the wall. An M8 eye bolt can go there, which you connect to a wall bracket or strap. If no hole is free, use a strap around the upper tube.
Do you sell a wall anchoring kit?
No. Standard anti-tip devices and furniture brackets from a DIY store work well. What matters is the right plug for your wall and a fixing point at the top of the unit.
What can I do in a rented flat?
A few drill holes within normal limits are allowed in many tenancies – if in doubt, ask your landlord. If that is not possible, build lower and wider, around a corner or connect two units, and store heavy items at the bottom.